
***************************
As a new(ish) DT member I'm very excited to host my first challenge, this time I would like to see EMBOSSING on your project. It can be heat embossing with your inks and embossing powders or dry embossing either by hand or using a machine so there is lots of scope for this challenge.
We have a lovely prize from Joanna Sheen for this challenge - a £10 voucher to spend in her online shop which is packed full of goodies!
Here's what we have come up with to inspire you, please do leave us a comment as we love to read them!

 I used the Glitter Girls Dress to Impress embossing board to emboss this little handbag. All you have to do is emboss the shape, cut it out and fold the score lines. I embossed some extra details on the same board to add the catches using some mirri board. The flowers and leaves are also embossed this time using a Crafters Companion board, some glue and a few sparkly stones for the middle and job done.
For this challenge, I have machine embossed the background, its a Tim Holtz texture plate that Ive fed through my cuttlebug and then just cut round the design, as you can see.
My printer is now running out of ink and has made lines on my image but the image is so stunning that for me, I can still get away using it......the only either items Ive used is a printed acetate die cut by K&Co and the wording has been chopped out of another printed die cut item by K&Co.


i have used my embossing folders with the vagabond machine for this card. various folders used the backing paper is just smooth white card embossed with as sweet as can be on the top and basket weave pattern on the bottom chalked over the birds,words and flowers to help them stand out more. the embellishments are cut and embossed from whitewash coredinations cardstock.then just some ribbon added to finish off

I have 2 for this one is a cheat emboss which is this one I wanted to show that even if you don't have an embossing maching with some of the gorgeous papers about today you can still get a great embossed effect for this I have used Sharon Duncan embossability papers

Now this is the card I did emboss the main BP is from MCS tattered lace cd rom then the silver strips are actually some tape we got to use on the car as we had a leak in the cooler tank didn't work so ended up having it and it embosses beautifully I used an embossing folder can't remember the name of it then I embossed the purple sheet with a different folder the image was cut amd embossed with a nestie and the the roses and bow I made myself dead easy.

I've used heat embossing for this card. The background was stamped with a swirl stamp in gold ink, and then embossed with holographic clear powder. I edged the card with more of the gold ink. The dragonfly was plain chipboard, and I used multiple layers of blue ultra thick powder, followed by a top layer of gold. While it was melted, I stamped it with a background stamp from the V and A collection. I finished the dragonfly with some Promarker coloured sticky gems.
 I decided to make a deep embossed pendant. I started with a 2" sq piece of mountboard, which I coloured with a black marker pen. Then added 3 layers of clear UTEE (Ultra Thick Embossing Enemal), whilst the last layer was still very hot and molten, I stamped it with a stamp I had previously prepared with Versamark clear ink on it.
After the piece of card had cooled, I removed the stamp, at this stage if your not happy you can melt the UTEE again, and start to stamp again. Once cool, I stamped with Versamark again and brushed on two mica colour powders. Brush it clear, then pat onto a wet wipe to provide the moisture for the mica powders to be set. Add a jewel finding and a chain. Apart from the gold chain, a very cheap, yet attractive piece of jewellery.
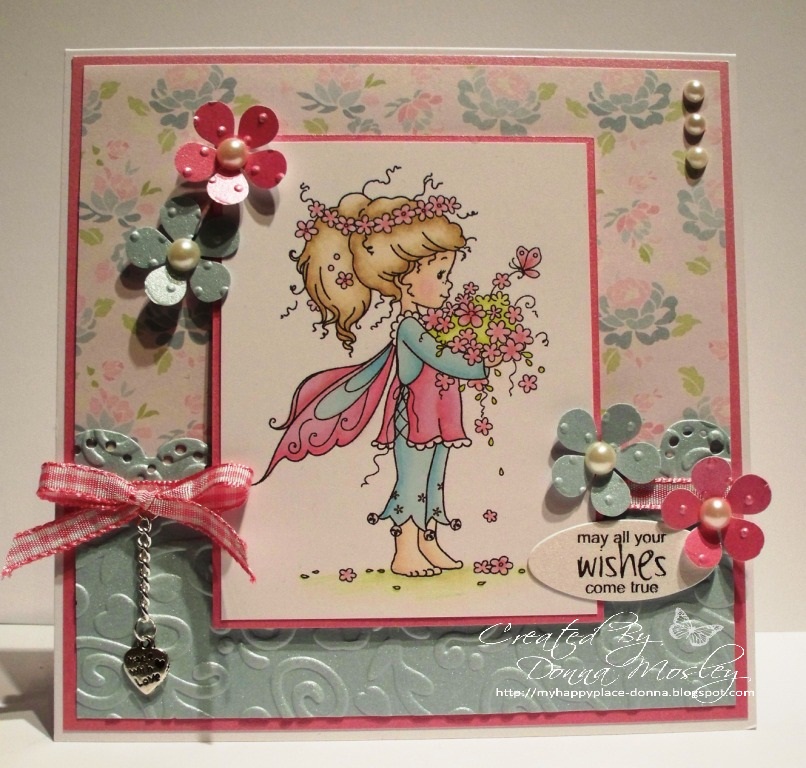
I decided on dry embossing for this challenge using my bigshot and embossing folders. I used a very cute Wee image that I coloured with Promarkers, Derwent pencils and Sansador. The paper is a freebie from a magazine and I chose pearl card to emboss as I love the effect it gives. I used a Magnolia Doohickey border die to edge the blue card before I embossed it. I then added a few flowers, made with an xcut punch and embossed. A craftwork card sentiment, some ribbon, charm and pearls to finish.

For the embossing part of my card I have used a cuttlebug embossing folder on purple pearl card and also Cor'dinations Whitewash card and then sanded it to reveal the purple underneath. My image is a stamp from LOTV coloured with ProMarkers.The roses are from Wild Orchid Crafts.The backing paper covering the card base is actually music notes from "the wedding march" but it's totally wasted because you can't see it lol

For this wee Challenge I wanted the Embossing to be the main focal point so I stuck with white and a touch of colour! I used my embossing folders for the panels and some hand embossing on the background! The image is coloured with promarkers and some embossed flowers, card candy and a sentiment to finish.

For this challenge I've gone for a double-whammy! LOL. Firstly I heat-embossed my image (CI-210) with Black deail embossing powder. I coloured it with some lovely Starburst Stains Then I added a little bit of Cuttlebug Embossing (D'vine Swirls folder) behind the image.

I love embossing, well heat embossing anyhow !!! I have stamped the cat and the writing and then embossed them both, then I inked the ATC and this caused the resist technique against the writing and the Cat. I also sprinkled on embossing powder randomly and then heated it all, gives a kind of smokey feel. Enjoy this challenge crafters. xx
Vix

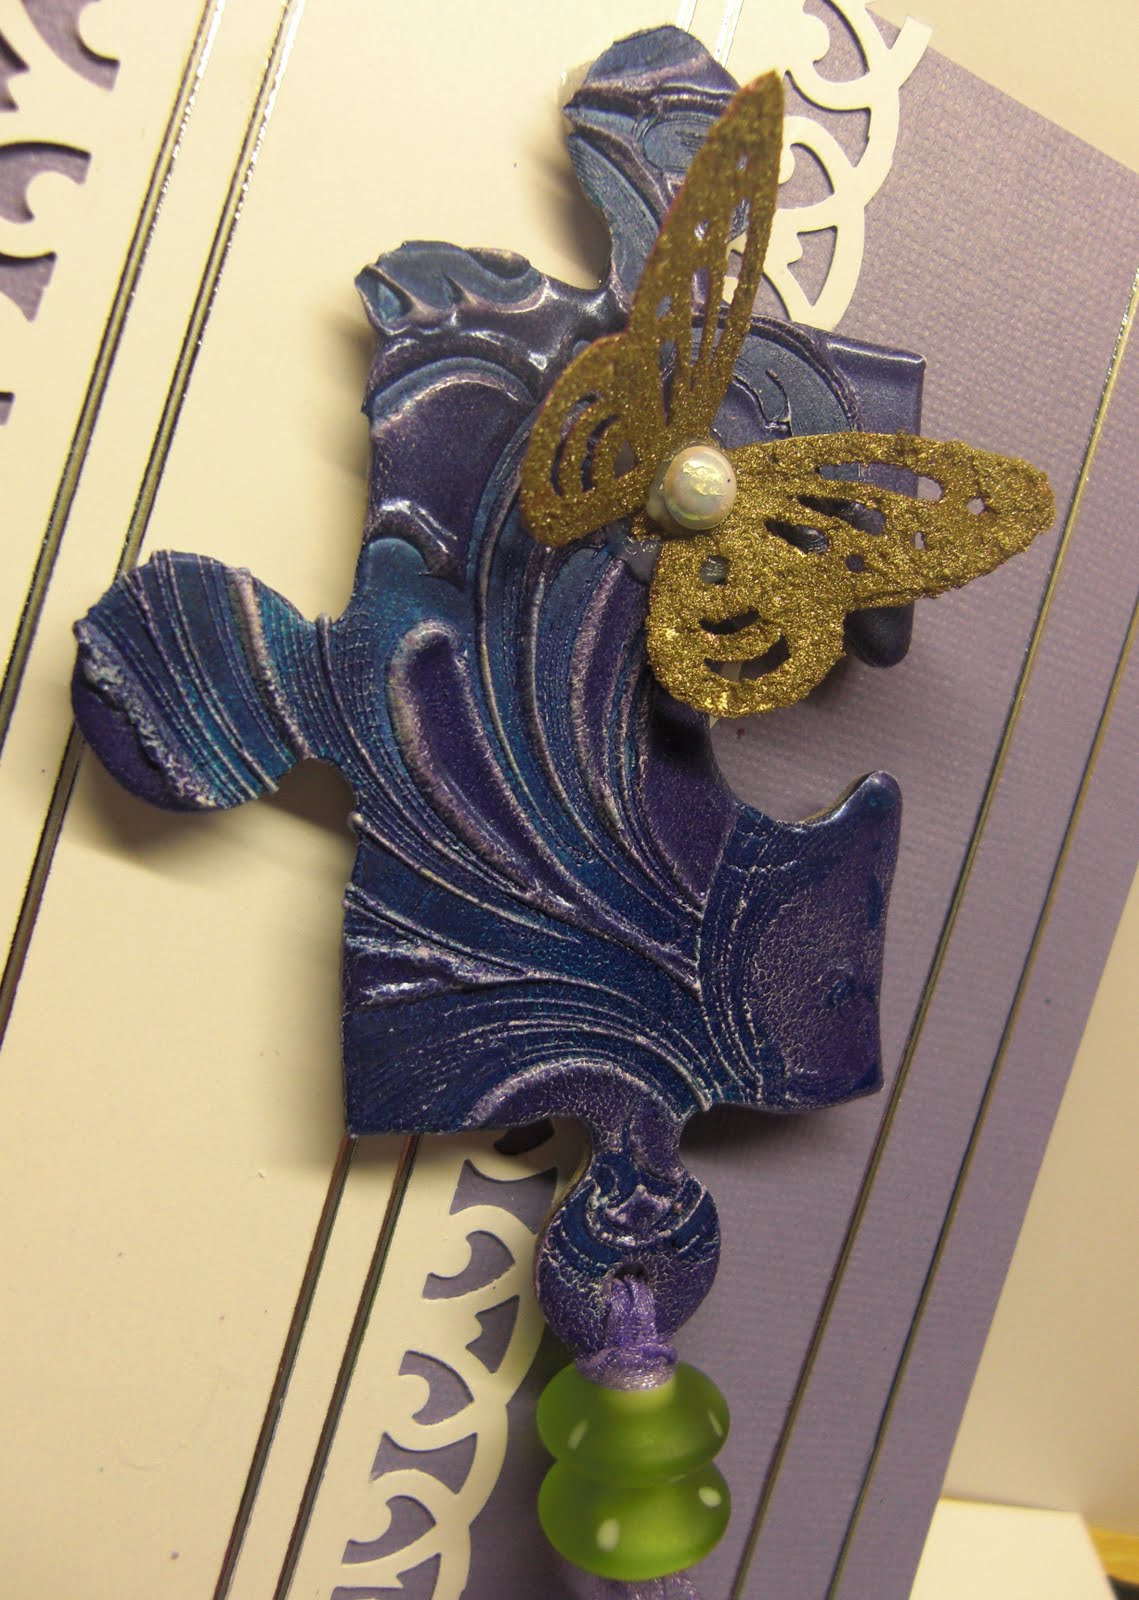
I love embossing particularly heat embossing so thought I'd have a play with this really old jigsaw piece I've had forever in my stash! I triple embossed with moonglow two tone embossing powders then placed the hero arts fabulous flourish stamp in the melted powder, added some ribbon and beads and some punched butterflies painted with ferro texture paint. Not sure if the card base is too plain but I had fun just playing anyhow :)

...shock horror..! Eiglas has done a pretty card....! LOL! Look closely and remember, it may not happen again for a while! Embossing you wanted, embossing you got - all three kinds although I did kinda cheat with the wet embossing and used a glaze pen! LOL!
I made an altogether different project then decided not to use it so it was 4.00 am when I finished this one!
Beautiful projects!!!I'm going right now to create something!Thank you for the inspiration!
ReplyDeleteAlex...
Great Challenge, love the design team cards, thanks for the inspiration
ReplyDeleteThanks for the chance to show my embossing and beautiful cards from DT.
ReplyDeleteThanks ladies very lovely and inspiring .
ReplyDeleteThank you girls, Debbiexx
ReplyDeleteI couldn't believe how awesome the DT's cards were. I really was blown away (well, I guess not literally - LOL). I don't do much heat embossing, because I never seem to have much success, but after seeing these, I'm more inspired to work on it. Hugs, dj1952
ReplyDeleteThe DT has done a fantastic job with the inspiration cards! I was happy to join the challenge and had a lot of fun making my card!!
ReplyDeleteGood Luck to ALL!!!
I guess there is something new in the way you want us to link up. I've gone to your tutorial, but is states the usual way - a link to my post. But when I try to do that (and I've entered hundreds of challenges so I'm not a newbie) I keep getting this message "The link you entered does not contain a backlink to this site. Please create a backlink to this site to be allowed to enter your own link."
ReplyDeleteAs I said, I entered my own link but that didn't work. Could you please explain how we are to create a backlink to our site to be able to enter our own link.
I will check back later to see if you have updated your tutorial. I really wanted to enter this challenge.
Thank you!
Wow, thanks for the response. That's certainly something new. I didn't know there was a specific order you had to do it in. Sometimes I link up and then go back and update my blog post and I have never run into that before. You should probably point that out in your tutorial.
ReplyDeleteAnyway, thanks again for the response. I was able to link up when did everything in the required order. Your DT samples are fabulous. I love embossing and really wanted to play along!
Awesome cards ladies I love the theme and thanks for the fun challenge,
ReplyDeleteHugs Bridget :0) x
Fabulous creations by the DT!!! Thank you for a fun challenge and for all the beautiful inspiration!!! Your DT is amazing!!!
ReplyDeleteHugs!
Carolyn:)
Beautiful cards DT! Thanks for a great challenge, I had actually posted that I was entered and just noticed that I never linked my card! Its been one of those weeks.
ReplyDeleteThank you for the lovely challenge and the wonderful inspiration!
ReplyDeleteabsolutely, utterly FANTASTIC inspiration from the DT here! i have to try some of those techniques! especially loving the electrical tape and the UTEE with the background stamp pressed into it. FABULOUS!
ReplyDelete